
A guide to setting up standard e-commerce using Google Tag Manager.
In Google Analytics, there are two main types of e-commerce:
- Standard Ecommerce
- Enhanced Ecommerce (EE)
Standard Ecommerce:
- Appeared earlier (in the ga.js library) than Enhanced Ecommerce (analytics.js).
- Is limited in the number of reports it provides.
- Is not as flexible as EE, but is easier to set up.
List of reports available in the standard version:
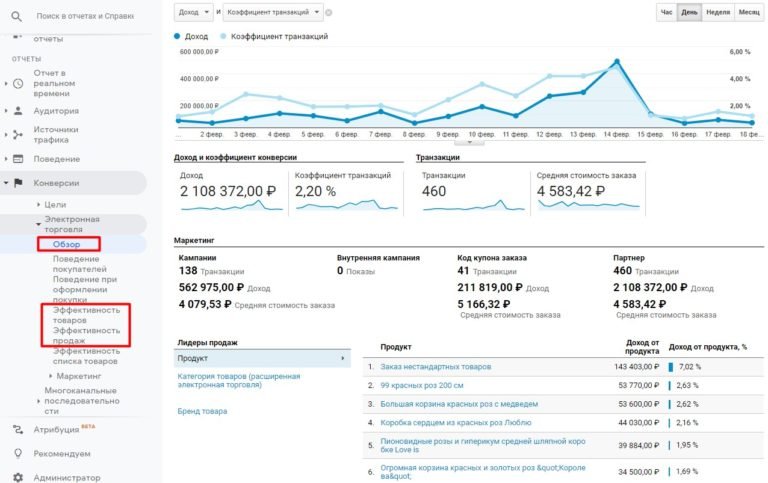
- Overview: Data on key metrics – revenue, transactions, average order value, transaction rate, etc.
- Product Performance: Data on each individual product – revenue, number of purchases, average price, product ID, product category, etc.
- Sales Performance: Revenue broken down by order ID and additional metrics – taxes, shipping costs, refund amount, etc.
While Enhanced Ecommerce offers up to 9 levels of action tracking (product impressions, product clicks, product detail views, promotion impressions, promotion clicks, checkouts, purchases, refunds), for Standard Ecommerce, it’s enough to configure ONLY purchases (transactions).
Which type of e-commerce should you choose?
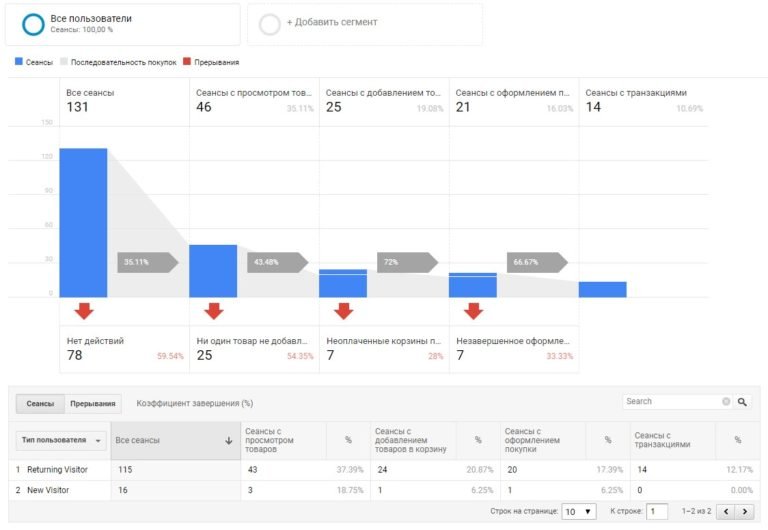
If you want to see only sales data, understand how effectively each product is selling, and which traffic sources generate sales, then it’s enough to set up Standard Ecommerce. If you want to see not only purchases but also user journeys from stage to stage on your site (how many users added a product to their cart, how many of them proceeded to the checkout step, and what proportion of those who reached it made a purchase), build segments based on them, and launch remarketing campaigns on them, then you should choose Enhanced Ecommerce.
To implement standard e-commerce on your website, you can use two setup methods:
- Through tracking code
- Using Google Tag Manager
The second method (using Google Tag Manager) will be discussed below, as it is the simplest and does not always require third-party assistance.
Who sets up e-commerce?
Usually, the management entrusts the setup of e-commerce to an internet marketer who also runs advertising campaigns and has access to web analytics counters (Google Analytics and Yandex.Metrica). However, this is not always the case. Setting up any type of e-commerce involves working with code that needs to be placed on the order confirmation page (in the case of standard implementation) or on several pages (when setting up enhanced e-commerce). You will see such codes both in the Google documentation and in any article on the Internet that is devoted to this topic.
Here is one example of transaction tracking for the gtag.js library, the purchase event:
					gtag('event', 'purchase', {
  "transaction_id": "24.031608523954162",
  "affiliation": "Google online store",
  "value": 23.07,
  "currency": "USD",
  "tax": 1.24,
  "shipping": 0,
  "items": [
    {
      "id": "P12345",
      "name": "Android Warhol T-Shirt",
      "list_name": "Search Results",
      "brand": "Google",
      "category": "Apparel/T-Shirts",
      "variant": "Black",
      "list_position": 1,
      "quantity": 2,
      "price": '2.0'
    },
    {
      "id": "P67890",
      "name": "Flame challenge TShirt",
      "list_name": "Search Results",
      "brand": "MyBrand",
      "category": "Apparel/T-Shirts",
      "variant": "Red",
      "list_position": 2,
      "quantity": 1,
      "price": '3.0'
    }
  ]
});
How to set up e-commerce?
This code cannot simply be taken from the documentation and inserted into your website. For the data to be correctly transferred to Google Analytics, you need to display your own value for each variable (id, name, list_name, brand, price, etc.). Moreover, data extraction for online stores on different CMS platforms can be implemented differently. For 1C-Bitrix, it’s one way, for OpenCart another, for WordPress another, and so on.
Therefore, when talking about setting up e-commerce, it implies the following – the person who sets up e-commerce should understand how to:
- Form an array with data
- Do this on a specific online store engine
- Extract this data and transfer it to web analytics tools
Not every marketer knows how to work with code. Even not every developer, well versed in one engine, will agree to perform this task for an online store on another platform. Therefore, setting up e-commerce (standard or enhanced) should be done at least in pairs: marketer and developer. The first one compiles a detailed and understandable technical task for the second, the developer implements it, and at the end, the marketer checks the correctness of the work done.
But the reality is that the customer does not have a developer on staff for this task. Then again, there are several options:
- Buy a ready-made solution (module/plugin) for your CMS platform
- Hire a remote specialist who will set up e-commerce for $
- Set up e-commerce by the marketer themselves through Google Tag Manager
Why is there no specific setup guide on the internet?
Firstly, all online stores are individual. Some have a website on a constructor where there may be no access to files for changes, some have a boxed solution, some write the engine from scratch, etc. Secondly, even within the same online store, e-commerce setup can be implemented in different ways (by directly adding tracking code or through Google Tag Manager), forming a data array through the data layer, or using your own JavaScript code. Thirdly, it is quite difficult to describe all the setup methods. It turns out to be a lot of different combinations.
After setting up e-commerce for Google Analytics, will it work for Yandex.Metrica as well?
Yes, if the setup in both cases is implemented using a data container (dataLayer). The official Yandex documentation says the following about this:
The name of the data container and the structure of the Ecommerce objects embedded in it correspond to similar entities in Google Analytics Enhanced Ecommerce. This means that if you have already set up data sending to Google Analytics Enhanced Ecommerce, including through Global Site Tag, and enabled Ecommerce in Yandex.Metrica, the latter will also start collecting data.
I want to note that the help refers to enhanced e-commerce. And in this article, we are talking about Standard Ecommerce.
How to set up standard e-commerce?
Let’s move on to a step-by-step plan for setting up standard e-commerce using Google Tag Manager.
Algorithm:
- Enable e-commerce reports in Google Analytics
- Send transaction data to the data layer
- Send data about the completed transaction to Google Analytics (through Google Tag Manager)
- Check the correctness of data transfer
Let’s analyze each item in more detail.
Enable e-commerce reports in Google Analytics
In Google Analytics settings, at the view level, go to the Ecommerce Settings section and Enable Ecommerce Tracking.
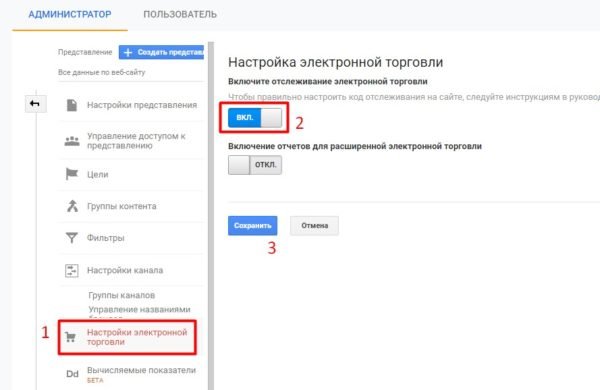
Save the settings.
Send Transaction Data to the Data Layer
The data layer is an object (array of objects) or JavaScript variable that stores and transmits information from your website to Google Tag Manager. It is a key component of GTM, used in tags, triggers, and variables. Those who understand the principle of formation and operation of the dataLayer have a significant advantage and can very flexibly configure tracking of various events on their website. If you are not yet familiar with the data layer, read the definition at the link.
To set up Google Analytics e-commerce tracking using Google Tag Manager, you need to pass transaction data to the data layer. Then, in Google Tag Manager, we create rules under which a purchase is considered successful, and then, using the Universal Analytics tag, we transfer information about the transaction from the data layer to Google Analytics.
How to set up e-commerce tracking is described in the official Google help. There is nothing better than following the original source. All transaction information must be passed through the data layer.
An example of the code looks like this:
					<script>
window.dataLayer = window.dataLayer || []
dataLayer.push({
   'transactionId': '1234',
   'transactionAffiliation': 'Acme Clothing',
   'transactionTotal': 38.26,
   'transactionTax': 1.29,
   'transactionShipping': 5,
   'transactionProducts': [{
       'sku': 'DD44',
       'name': 'T-Shirt',
       'category': 'Apparel',
       'price': 11.99,
       'quantity': 1
   },{
       'sku': 'AA1243544',
       'name': 'Socks',
       'category': 'Apparel',
       'price': 9.99,
       'quantity': 2
   }]
});
</script>
There are two data types with their mandatory variables and type:
1. Transaction data (transactionId, transactionTotal);
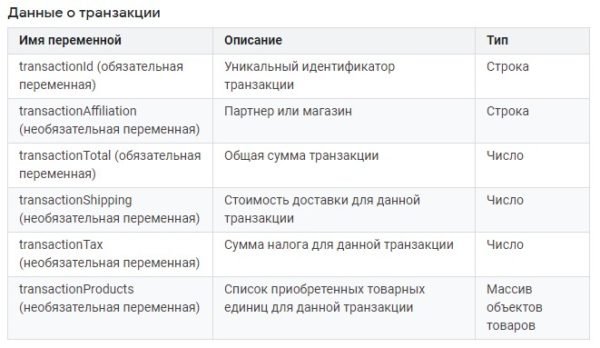
2. Product data (name, sku, price, quantity);
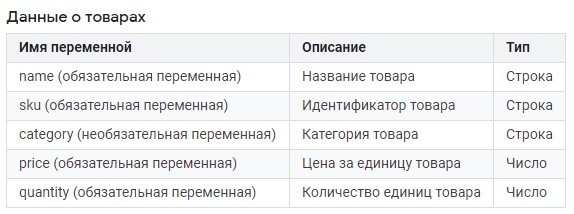
Important:
- Variable names (`transactionId`, `transactionTotal`, `transactionShipping`, etc.) must be named exactly as written in the Google documentation.
- Each variable has its own data type. Some are strings, some are numbers. This is important because transaction data can be transferred not only to Google Analytics but also to other web analytics tools, such as Facebook. An incorrect variable type will cause an error.
- The entire code structure must be identical to the one presented in the Google help. You can omit optional parameters, but you cannot rename `transactionId` to `purchaseId`.
- The example above is just an example. Accordingly, the values of all parameters must be dynamically replaced by the function(s) that the developer will write. Simply copying this code will not lead to anything. After all, transaction 1234 (in the example above) may not exist in your case at all, and the purchase amount changes from order to order.
- Custom variables are not supported in the code. The person who forms the data layer must strictly follow the guide and use the variables that are in the documentation.
- Not all variables presented in the code above are mandatory. You can reduce their number, leaving only the required ones.
Thus, to form a data layer for standard e-commerce, you can go two ways:
- Fill in and transfer to web analytics tools only 2 mandatory variables about the transaction itself (unique transaction identifier `transactionId` and the total transaction amount `transactionTotal`).
- Fill in and transfer to web analytics tools 2 mandatory variables about the transaction and + 4 about the products in the order. In this case, `name`, `sku`, `price`, `quantity` are added to `transactionId` and `transactionTotal`. A total of 6 variables.
You decide how much data and what data to transfer to Google Analytics. However, the more data you transfer, the more information you will see in e-commerce reports.
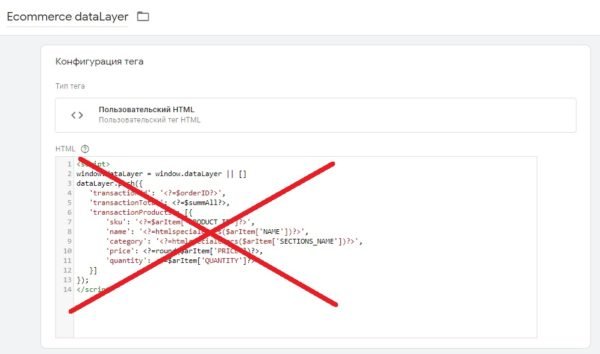
Google Tag Manager does not support PHP, so if your developer sends you a formed data layer of this kind:
					<script>
window.dataLayer = window.dataLayer || []
dataLayer.push({
   'transactionId': '<?=$orderID?>',
   'transactionTotal': <?=$summAll?>,
   'transactionProducts': [{
       'sku': '<?=$arItem['PRODUCT_ID']?>',
       'name': '<?=htmlspecialchars($arItem['NAME'])?>',
       'category': '<?=htmlspecialchars($arItem['SECTIONS_NAME'])?>',
       'price': <?=round($arItem['PRICE'])?>,
       'quantity': <?=$arItem['QUANTITY']?>
   }]
});
</script>
And you want to insert it into a Custom HTML tag, you’ll either get a compiler error or you’ll just get raw PHP code output to your browser, rather than executing the code itself. If you want to see the result of a PHP script, you will need to run the script on your own server and get the results via JavaScript. This is where your knowledge of Google Tag Manager comes in handy.
Google Tag Manager and DOM Scraping
But what if we don’t want to or can’t ask a developer for help? Then we need to form the data layer ourselves. This can be done using Google Tag Manager. The technology of obtaining web data by extracting it from website pages is called in English DOM Scraping (Web scraping). This is what we will be doing.
In this method of extracting data from a page, there is one significant drawback – everything we do is tied to the Document Object Model (DOM). And when changing any classes or identifiers of tracked elements on the site, there is a high probability of losing all settings. That is why it is better to track e-commerce or any other non-standard events on the site using functions and involving a developer, rather than extracting data using scraping.
As an example, I will use one of the online stores selling adult goods on the inSales platform and the following tools:
- GTM Variable Builder extension for the Google Chrome browser, which allows you to create user-defined variables of the Custom JavaScript type and extract values from site elements in just a couple of clicks.
- A special tag from the Template Gallery called dataLayer Builder + Standard Ecommerce.
inSales does not support PHP. But in the settings, there is an option to add your own JavaScript code:
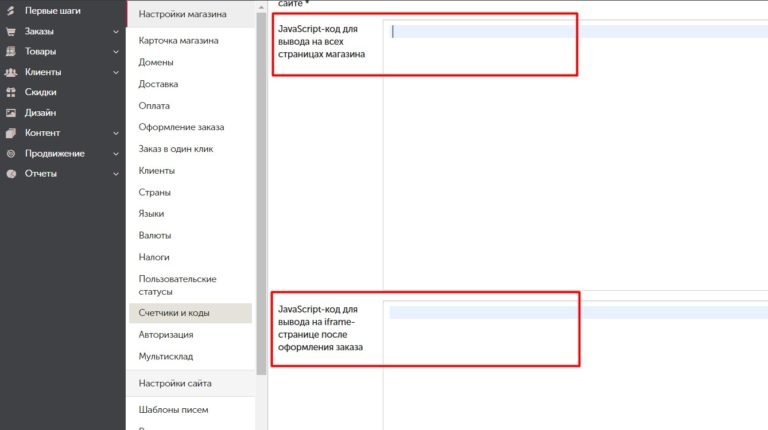
I will not use these fields, but will form the data layer through Google Tag Manager. Let’s proceed to extract the required variables to set up standard e-commerce.
Important:
The values of all variables extracted from the page must be available on the “Thank You” page at the time the tag is sent. If the transaction ID, total purchase amount, or any other required variables that are involved in the formation of the data layer (product data – name, sku, price, quantity) are not displayed on the page, then you will still need to resort to the help of a developer. For scraping, it is important that the extracted data is on the page we need. In this case, it is the successful purchase page (“Thank You”). If this data is not there, then there is nothing to extract.
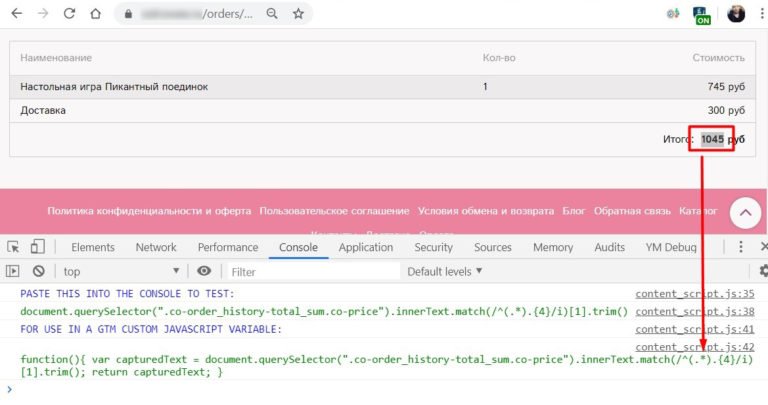
In my example, the successfully completed order page looks like this:

From this page, we can extract data about the variables transactionId and transactionTotal (shown in two places in the example), shipping cost transactionShipping, although it is not mandatory, as well as the product name name and quantity quantity. Unfortunately, for the correct formation of the data layer, 2 mandatory variables out of 4 for product information are not enough. Therefore, there are two choices:
- Ask the developer to modify this page and add the missing
skuandprice. - Pass only
transactionIdandtransactionTotaltransaction data in the data layer without any other variables.
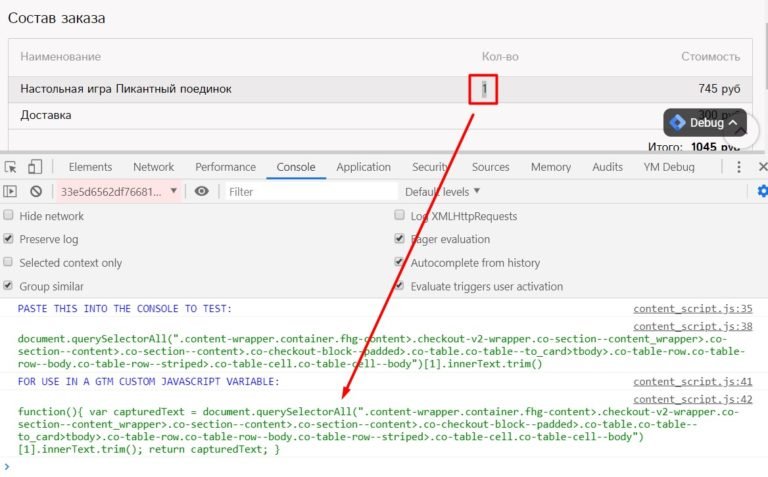
Suppose we chose the second option. To extract data for these variables, we will use the GTM Variable Builder extension.
- Select the desired fragment on the page to extract data.
- Click on the GTM Variable Builder extension icon in the upper right corner of the browser.
- On the Console tab, we get the result.
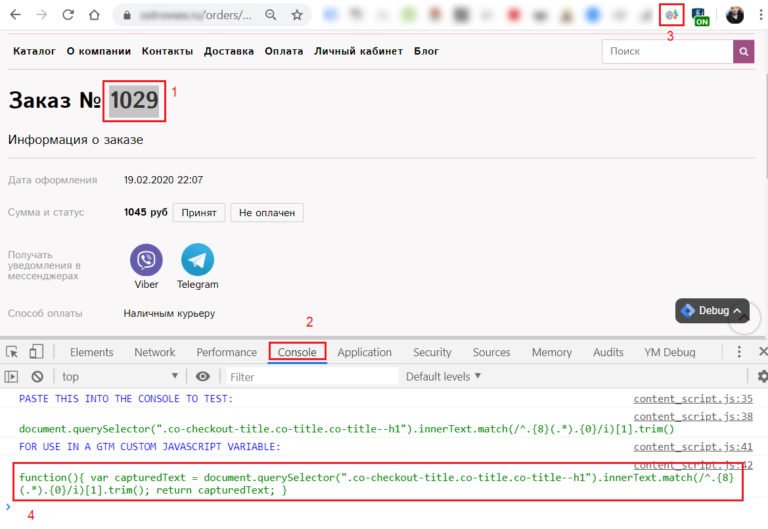
- Copy the code from the line FOR USE IN A GTM CUSTOM JAVASCRIPT VARIABLE and paste it into a variable of the Custom JavaScript type.
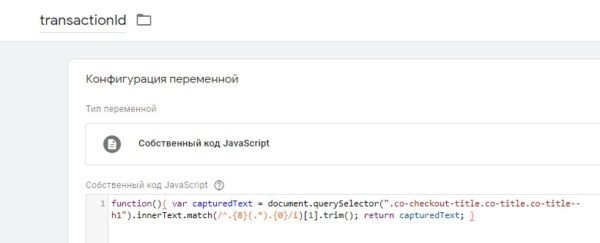
Save the variable. Do the same with all the other variables. Remember that the total transaction amount (`transactionTotal`) must be a number. If you don’t want to use the GTM Variable Builder extension, then you should look for the CSS selector of a specific element on the “Thank You” page, copy it, if necessary, manipulate this element (convert the data type, trim part of the text, etc.), and then add it to a custom variable of the Custom JavaScript type.
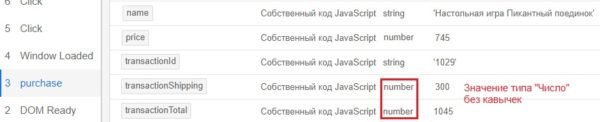
In Google Tag Manager, in preview mode, on the Variables tab, data is displayed next to a specific event. The values of variables with the type number are displayed without quotes, and those with the type string are displayed in quotes. As in the case with transactionId:
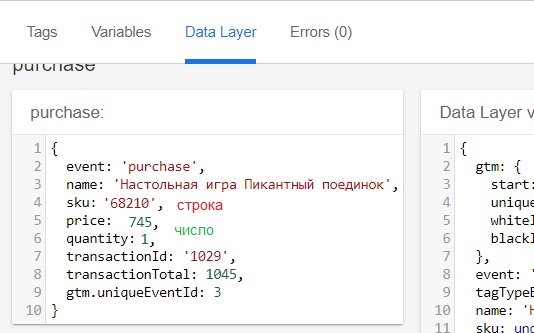
On the Data Layer tab, variables with a numeric value are highlighted in green, and those with a string value are highlighted in red.
Note: You can extract numeric variables (e.g., shipping cost or total transaction amount) using GTM Variable Builder not entirely, but only partially (without the currency symbol). Just select the fragment, and the extension will automatically add the necessary regular expression.
Extracting product data is a bit more complicated because there can be multiple products in one transaction. Here we also need the CSS selector of the product, which we will extract from the “Thank You” page. If you use the GTM Variable Builder extension, it will generate the code for the variable itself and will use `document.querySelectorAll` instead of `document.querySelector` because you need to capture all product values, not just the first one.
If you are extracting data manually, use the code below:
					function(){
var items = document.querySelectorAll("CSS-селектор");
var itemsLength = items.length;
var myProducts = []
for (i = 0; i < itemsLength; i++) {
    myProducts.push(items[i].innerText);
}
  return myProducts;
}
, where you insert the value that is present on your website in the “CSS selector” field.
document.querySelectorAll – returns a static (not live) NodeList containing all elements in the document that match the specified selector.
document.querySelector – returns the first element (Element) in the document that matches the specified selector or group of selectors.
Since there can be several products in an order (2, 3, 5, 10, etc.), `document.querySelector` (as it was in the examples earlier) will not suit us, because it will add only the first element to the array. To fit all the products that the user bought into the dataLayer, we use `document.querySelectorAll`.
For clarity, I will give an example of extracting `quantity` using GTM Variable Builder on the “Thank You” page:
As you can see, GTM Variable Builder returned a value with `document.querySelectorAll`. This means that the correct information will be passed to the dataLayer.
Note: Use a period (.) as the decimal separator in numbers, not a comma. When passing a numeric value, a comma may be incorrectly interpreted.
So, what did we end up with? In the example of my online store, on the “Thank You” page, I can extract 2 mandatory variables for transaction data (`transactionId` and `transactionTotal`), 1 optional variable (`transactionShipping`), and 2 out of 4 for forming product data (`name` and `quantity`). The only things missing on the successful checkout page are the product ID (`sku`) and the price per unit of the product (`price`). In this case, I can only send 2 variables to the data layer, and then this information to Google Analytics.
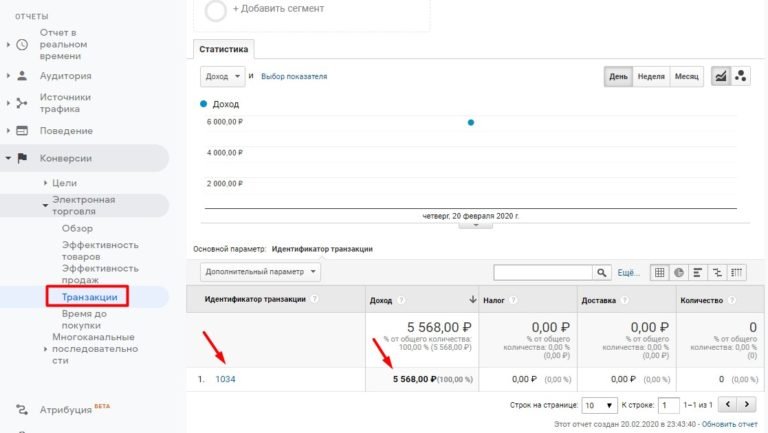
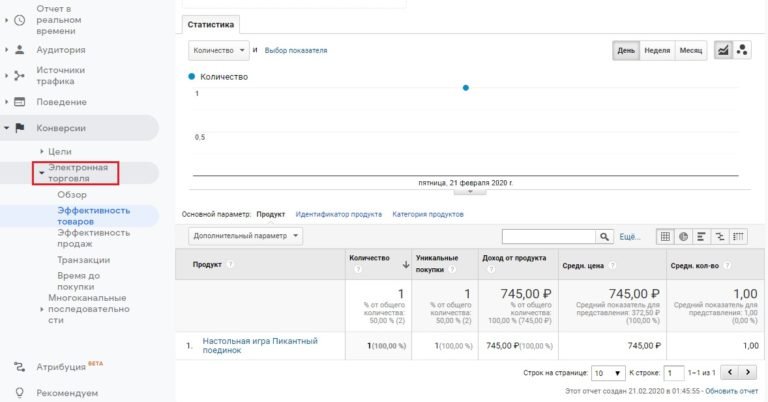
As a result, in the “Transactions” report in Google Analytics, we will get the following data:
And the data layer itself in Google Tag Manager will look like this:
Thus, it is possible to set up the simplest implementation of the data layer for standard e-commerce and transfer this information to Google Analytics using only 2 mandatory variables. If you need to transfer product data as well, then form another data layer containing +4 mandatory variables (`name`, `sku`, `price`, `quantity`). But first, extract the values of all required variables using GTM.

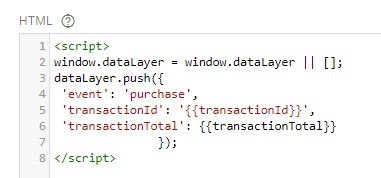
If, like me in this example, you are missing some data, you can skip those variables and form the data layer without them:
					<script>
window.dataLayer = window.dataLayer || [];
dataLayer.push({
 'event': 'purchase',
 'transactionId': '{{transactionId}}',
 'transactionTotal': {{transactionTotal}},
 'transactionShipping': 0,
 'transactionProducts': [{
   'sku': '',
   'name': '{{name}}',
   'price': '',
   'quantity': {{quantity}}
}]
  });
</script>
Google Analytics will simply not receive all the information about the products, and the missing values in the reports will say (not set).
There are several ways to form such a data layer:
- Create a tag of the Custom HTML type.
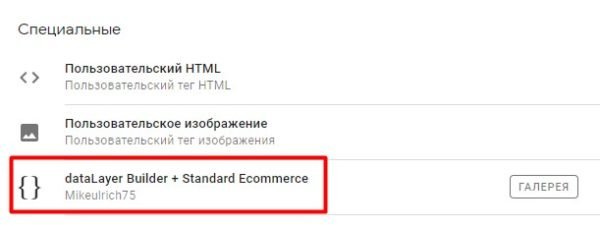
- Use a special tag from the Template Gallery called dataLayer Builder + Standard Ecommerce.
Let’s look at two ways to configure this.
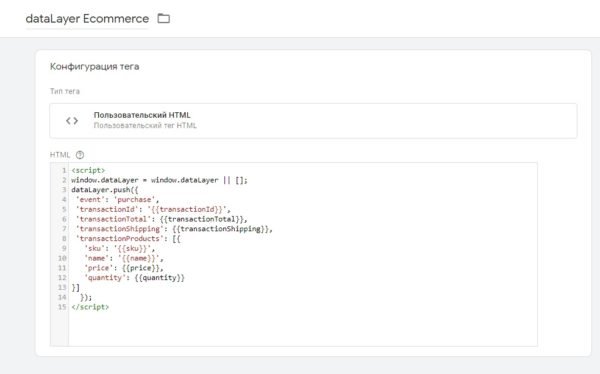
Creating a Custom HTML Tag
Go to the Tags section and create a tag of the Custom HTML type. Paste the following structure into it:
					<script>
window.dataLayer = window.dataLayer || [];
dataLayer.push({
 'event': 'purchase',
 'transactionId': '{{transactionId}}',
 'transactionTotal': {{transactionTotal}},
 'transactionShipping': {{transactionShipping}},
 'transactionProducts': [{
   'sku': '{{sku}}',
   'name': '{{name}}',
   'price': {{price}},
   'quantity': {{quantity}}
}]
  });
</script>
In Google Tag Manager, it will look like this:
Каждой обязательной переменной присваивается значение переменной, которое мы создали на предыдущих шагах. С помощью двойных фигурных скобок {{ }} мы можем обратиться к любой переменной GTM.
Такой код работает в случае, если у вас 1 товар. Но если их несколько, то данные о товарах в уровне данных будут собраны не совсем корректно:
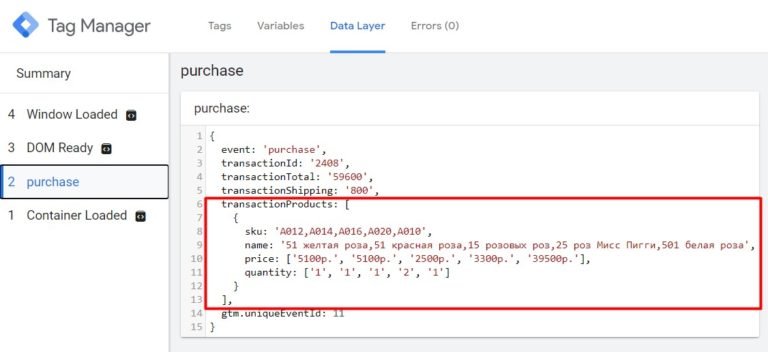
Incorrect product data array
You need to use the following code, which iterates over all the products in the order in a loop and then forms the correct property of the transactionProducts object:
					<script>
var ecomProducts = [];
for (var i = 0; i < {{sku}}.length; i++) {
ecomProducts.push({
'sku' : {{sku}}[i],
'name' : {{name}}[i],
'category' : '',
'price' : {{price}}[i],
'quantity' : {{quantity}}[i]
});
}
window.dataLayer = window.dataLayer || [];
dataLayer.push({
'event' : 'purchase',
'transactionId' : {{transactionId}},
'transactionAffiliation' : '',
'transactionTotal' : {{transactionTotal}},
'transactionTax' : 0,
'transactionShipping' : {{transactionShipping}},
'transactionProducts' : ecomProducts
});
</script>
Then, when the purchase event is triggered, the data array will be formed correctly:
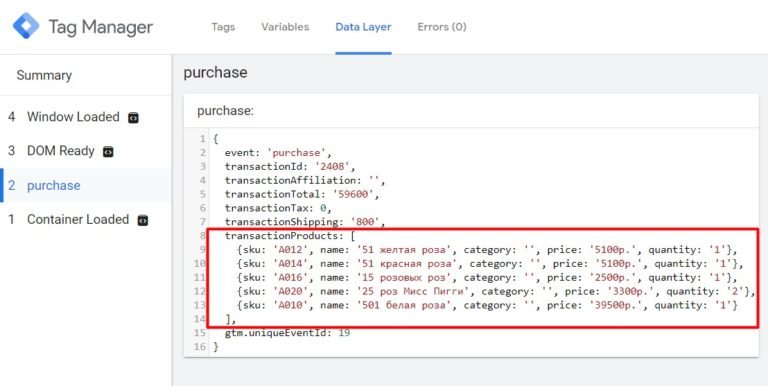
correct product data array
Использование специального тега из Галереи шаблонов
В октябре 2019 года команда Google представила Галерею шаблонов, которая призвана помочь рекламодателям в работе с тегами партнеров. Независимые разработчики могут делиться своим решениями, чтобы другие быстро внедряли и управляли их тегами, а также снижали вероятность неправильной настройки.
Некоторое время назад в Галерее шаблонов появился dataLayer Builder + Standard Ecommerce и dataLayer Builder + Enhanced Ecommerce от Mikeulrich75. Поскольку мы настраиваем стандартную электронную торговлю, то устанавливаем его.
The tag simplifies the formation of the data layer. You no longer need to create a custom HTML tag, manually register variables, or monitor the syntax of the code (correcting quotes, commas, brackets, etc.). All this can be done in a simple and convenient tag interface. It is somewhat reminiscent of the Lookup Table user-defined variable in Google Tag Manager.

In the Event Name field, enter the name of the custom event. This is purchase. In the transaction parameters, there are only two required keys with their values – these are transactionId and transactionTotal. But I also had transactionShipping. In the value field, I add the created variables (see above). We do the same with the product parameters – name, sku, `price`, `quantity`.
Thus, with the advent of the GTM Template Gallery and the ready-made tag from Mikeulrich75, it has become easier to form a data layer for e-commerce. But you can also use the first setup option, whichever is more convenient for you.
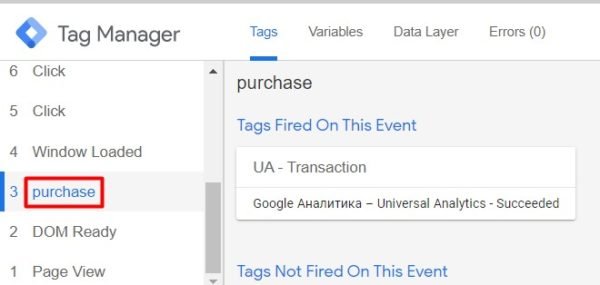
In the code above, we place a GTM event named purchase on the data layer. In order for the event to fire and the data to be sent to Google Analytics, you need to:
- Create a custom event
purchase. - Create a Universal Analytics tag with the tracking type Transaction.
But before we do that, let’s look at the different ways to place the data layer on the site page. To find out where the dataLayer.push() method should be added, you need to think about what happens after a successful purchase?
Is the buyer redirected to a separate “Thank You” page with a unique URL? Or does the page remain the same, the URL does not change, and the user is only shown a message on the screen about a successful transaction?
If the customer is redirected to the “Thank You” page and you are using a data layer without an event, then the e-commerce code should be placed above the Google Tag Manager container code.
What does dataLayer.push() without an event mean?
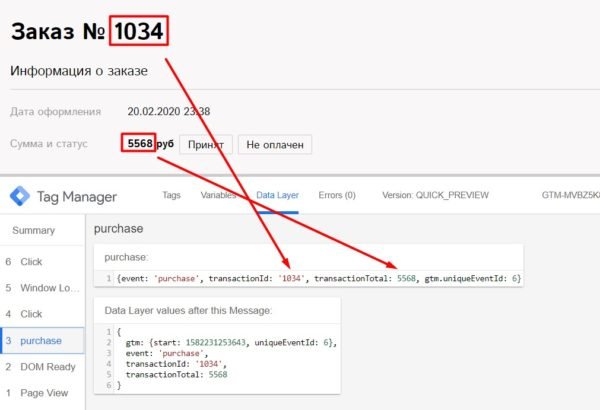
And now I would like to show you one subtle detail that many might not have noticed, but which plays an important role in tracking e-commerce. And this is a line of code with 'event': 'purchase' and without it. In the official documentation and at the very beginning of this article, I gave this code:

And then in Google Tag Manager, I configured it like this:

Formed data layer for e-commerce
It would seem that the difference is in one line 'event': 'purchase' after dataLayer.push, but it changes everything. In the first case (without event), the order of code placement (BEFORE or AFTER the GTM container) is important, but in the second case, it is not anymore, since this is a classic format of a Google Analytics event, where there is Category, Action, Label, Value. It just looks a little more complicated. But if you look closely and write the code in one line, it becomes very similar:
dataLayer.push('event', 'purchase', {'transactionId':'{{transactionId}}', ....});
to the structure of a regular tracked event, for example, for the gtag.js library:
gtag('event', <action>, { 'event_category': <category>, 'event_label': <label>, 'value': <value>});
And what does this mean? If the dataLayer does not have a line with event, then we will not be able to create a trigger of the Custom Event type and activate it at the moment when we need it.
Method #1: The dataLayer.push() code is added BEFORE the GTM container (on the “Thank You” page)
Let’s go back to placing the dataLayer.push() code above the GTM container code if the user is redirected to the “Thank You” page with a separate URL. Why is it so? Because then the e-commerce transaction data will already be available to Google Tag Manager when it starts loading. And the sooner this data is transferred to the data layer, the faster we can send this data to Google Analytics.
Since this dataLayer.push does not have an event parameter (as I wrote above), in debug mode it will be displayed with the word Message.
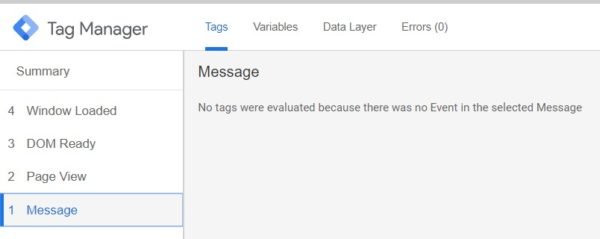
Code located BEFORE the GTM container
We cannot use Message as a trigger in GTM. Therefore, the earliest time we can send transaction data to Google Analytics is the Page View event.
You know perfectly well that every time a page loads on the site and you turn on GTM preview mode, 3 events are displayed there: Page View, DOM Ready, and Window Loaded. If the developer places the e-commerce code with dataLayer.push before the Google Tag Manager container on the site, then you can send transaction data to Google Analytics with the Page View event.
Method #2: The dataLayer.push() code is added AFTER the GTM container (on the “Thank You” page)
Since this dataLayer.push also does not have an event parameter, it will also be displayed as Message in debug mode.
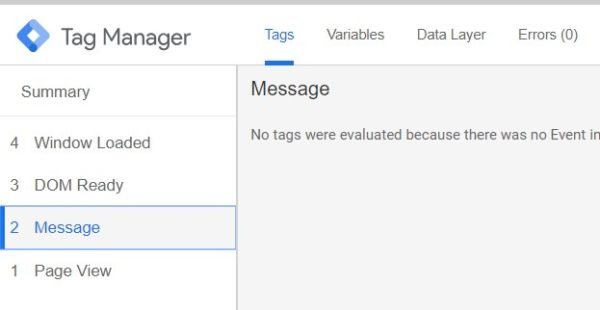
Code located AFTER the GTM container
However, this time `dataLayer.push` was completed a little later because it is located below the Google Tag Manager container. Now, with the Page View event, we will not be able to access the data. It remains to use only two other events: DOM Ready or Window Loaded. Most often, the second event, DOM Ready, is used for configuration.
Method #3: The dataLayer code is activated on the page using an event
In this method, an additional event parameter (`event`) is used, the value of which is the purchase (`purchase`).
This method is most often used by web analysts, since with the help of a custom event we can configure the activation of the trigger and tag as we like.
And now we return to our example and the part where, in order for the event to fire and the data to be sent to Google Analytics, you need to:
- Create a custom event
purchase. - Create a Universal Analytics tag with the tracking type Transaction.
To create a custom event, go to the Triggers tab and create a trigger of the Custom Event type with the event name purchase:
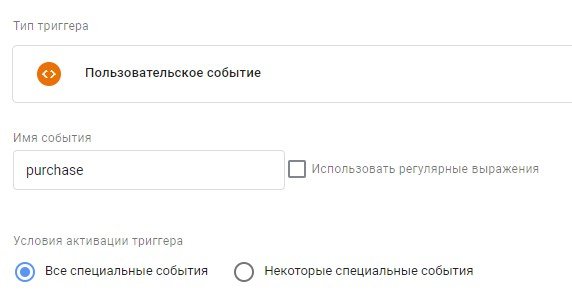
Next, go to the Tags tab and create a Universal Analytics tag with the tracking type Transaction.
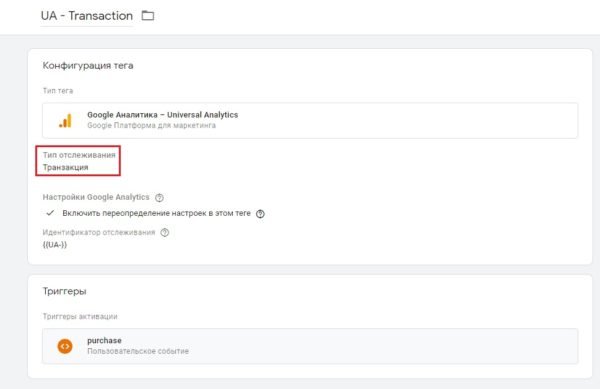
As the activation trigger, specify the custom event purchase. Save the settings.
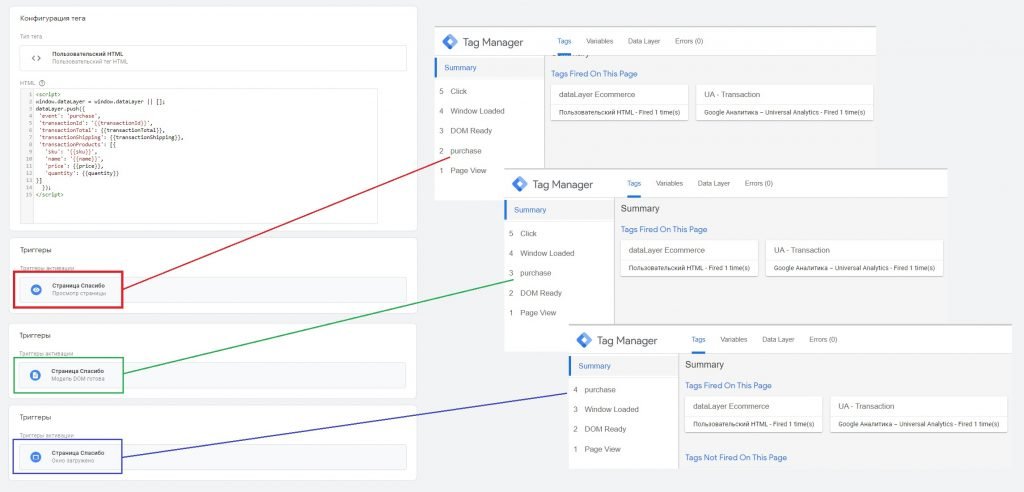
And the last thing left to figure out is the activation trigger for the data layer, which is formed in the tag of the Custom HTML type. What is it? Provided that you use the third tracking method (code with the event 'event':'purchase'), it does not matter what to choose. The difference will be when the data is transmitted – with Page View, with DOM Ready, or with Window Loaded. They will be transmitted anyway.
As a trigger activation condition, you can specify the specific “Thank You” page. In my example, this is implemented through the page title, which on the successful order page has the title Order #:

All that’s left to do is to check the correctness of the data layer formation and sending transaction information to Google Analytics. You can use the GA Debugger extension for this.
Enable the extension, open the Console tab in your browser, and make a transaction. You will see a lot of information appearing in the console. GA Debugger checks the website and outputs all information related to Google Analytics. We are interested in hitType - transaction:
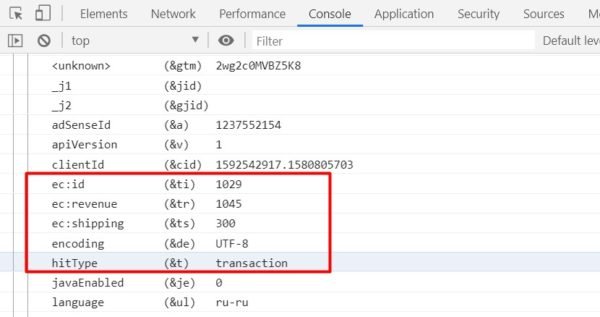
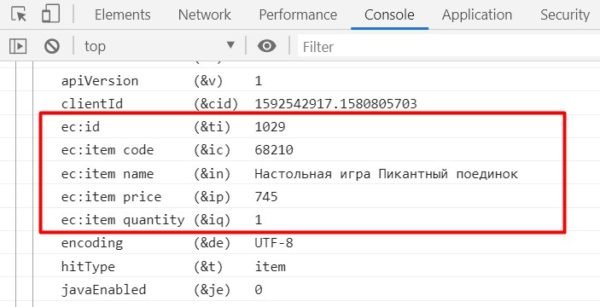
This is a purchase that was sent to Google Analytics. ec:id is the transaction ID, ec:revenue is the total purchase amount (in Google Analytics – Revenue), and ec:shipping is the shipping cost. If you are passing information about purchased products, then scroll down the console. You should see the following data:
Review the entire console for errors. If there are any, correct them yourself or consult with the developer. If there are no errors, then the setup of standard e-commerce using Google Tag Manager is complete.
Tracking data is available in Google Analytics reports under Conversions – Ecommerce:
Conclusion
Summary
While standard ecommerce is simpler to set up than enhanced ecommerce due to fewer tracked events, it can still be challenging for beginners.
In this guide, we have:
- Thoroughly examined the setup process without involving a developer and the code for standard ecommerce;
- Learned about required and optional variables for the data layer;
- Worked with DOM Scraping technology;
- Learned how to extract data directly from the page and using GTM Variable Builder;
- Got acquainted with tools that simplify work – GTM Variable Builder, a special tag dataLayer Builder + Standard Ecommerce, GA Debugger;
- Mastered 3 ways to place the data layer on the website page;
- Transferred all information to Google Analytics.
As I mentioned earlier, it’s not recommended to use information extraction from the website page to form the data layer, as any changes to CSS selectors of elements by the developer will lead to tracking failures. However, setting up standard ecommerce using DOM Scraping without involving a developer demonstrates the full power of Google Tag Manager.
All the information provided has been verified and applied in practice by Web Analyst immedia with the support of a Frontend developer on internal projects of Improve Media.